
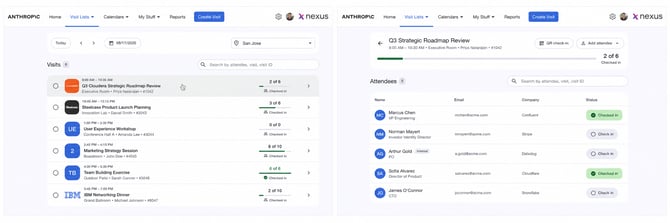
There are two ways to use the Check-in Module: the internal Check-in page inside Nexus, for Admins and Briefing Managers, and a standalone Check-in page for reception or lobby staff who don't use the rest of Nexus.
Before you start
- Who can use it: Admins and Briefing Managers (internal Check-in page). Reception or onsite staff with the site's Check-in URL (standalone Check-in Module). Attendees (QR self-registration).
- Action required: None for the internal Check-in page. For standalone check-in and QR check-in, an Admin must turn on Enable Standalone Check-in Module for each site.
- Where to find it: Internal Check-in: Visit Lists > Check-In. Standalone setup: Admin / Settings > Sites > Edit Site > External Access.
Heads up: When Require Access PIN is off, anyone with a site's standalone Check-in Module URL can open that site's visit list and attendees. Require Access PIN is on by default.
How do I set up the standalone Check-in Module for a site?
Turn on Enable Standalone Check-in Module in the site's External Access settings, then share the Check-in Module URL (and Access PIN) with your reception staff.
- Go to Admin / Settings > Sites and edit the site.
- Open External Access.
- Turn on Enable Standalone Check-in Module.
- Leave Require Access PIN on (recommended), or turn it off.
- Use Copy URL and Copy PIN to share the Check-in Module URL and six-digit Access PIN with reception staff.
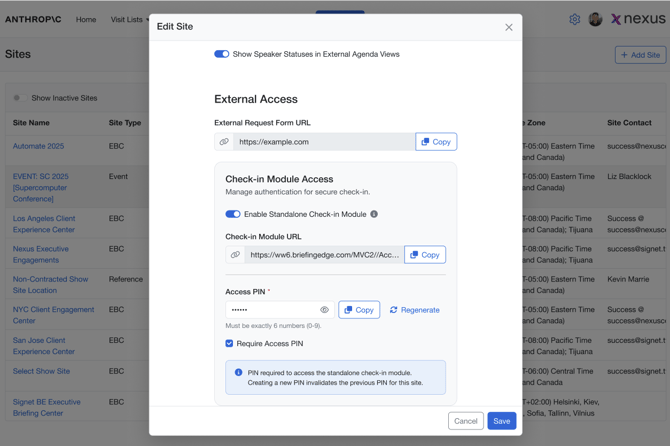
Each standalone Check-in Module URL works for one site only. Reception staff can't switch to another site or open any other part of Nexus, such as Reports, Settings, or Create Visit.
How do I change the Check-in Access PIN?
Click Regenerate PIN in the site's External Access settings. The old Access PIN stops working immediately, so share the new PIN with reception staff.
How do I check in attendees?
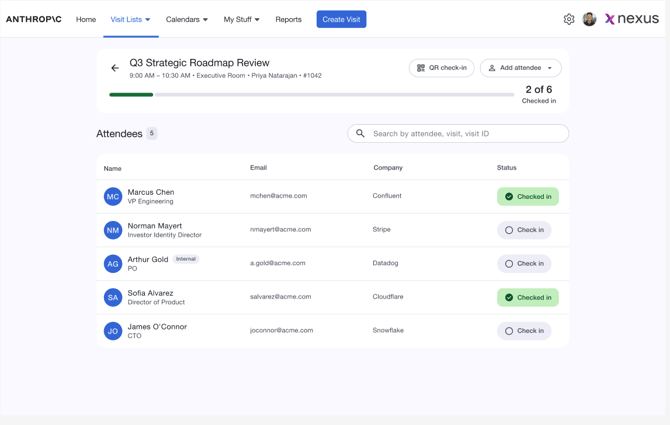
Open the visit from the Check-in page and click Check in next to each attendee as they arrive.
- Open the Check-in page: Visit Lists > Check-In inside Nexus, or the site's standalone Check-in Module URL.
- Select the site and date. The date defaults to today, in the site's time zone.
- Find the visit. Search by attendee name, attendee email, visit name, or Visit ID.
- Click the visit card to open its attendee list.
- Click Check in next to the attendee.
The attendee shows as Checked in, and the visit's check-in count and progress update. To undo a check-in, click Checked in, or use Undo in the confirmation message.
How do I check in a visit?
Use the visit-level check-in on the visit's Check-in page to record that the visit itself has arrived. Visit-level check-in is separate from attendee check-in: checking in a visit doesn't check in any attendees, and removing a visit-level check-in doesn't change any attendee's check-in status.
How do I add a walk-in attendee?
From the visit's Check-in page, click Add walk-in (standalone Check-in Module) or Add attendee (internal Check-in page), enter the attendee's details, and save. The attendee is added to the visit and checked in automatically.
- Open the visit on the Check-in page.
- Click Add walk-in or Add attendee. On the internal Check-in page, choose Customer or Internal.
- Enter the attendee's details, such as first name, last name, email, company, job title, and phone.
- Click Register & Check-in. The button becomes available once the required fields are complete.
Walk-in attendees added through the standalone Check-in Module are added as Customer/External attendees.
Exception: If an attendee with the same email address already exists, Nexus reuses that attendee instead of creating a duplicate. If they weren't checked in yet, they're checked in. If they were already checked in, their check-in stays as it is.
How do attendees check themselves in with a QR code?
Click QR check-in on the visit's Check-in page to show a QR code. Attendees scan it with their own phone, fill in their details, and click Register & Check-in. They're added to the visit and checked in automatically.
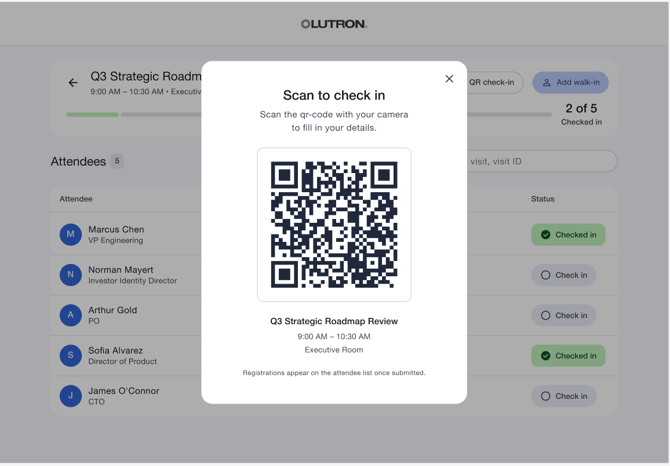
- Each QR code belongs to one visit, and any number of attendees can scan the same QR code.
- The QR registration page only shows the selected visit's details and the registration form. Attendees can't see the visit list, other attendees, or check-in controls.
- QR check-in is available on both the internal Check-in page and the standalone Check-in Module. Internal users don't need the Access PIN.
What should I know about the Check-in Module?
- Admins can see every active site on the Check-in page. Briefing Managers can only see active sites included in their Site Access.
- The standalone Check-in Module shows Incomplete, Held, Tentative, Confirmed, Closed, and Completed visits. It doesn't show Cancelled, Declined, or Erased visits.
- When Require Access PIN is on, staff must enter the Access PIN again to go back from a visit to the full visit list. This stops an attendee using the same device from seeing other visits.
- For multi-day visits, the Check-in page shows the time and room for the selected date. If a visit uses several rooms that day, the first room is shown.
- The contact shown on each visit card is the visit's first active Host, or the first active Meeting Owner if there's no Host.
- Add attendee on the internal Check-in page only offers Customer or Internal if that attendee type is shown in the visit's Request Setup.
Frequently asked questions
Do reception staff need a Nexus account to use the Check-in Module?
No. Reception staff only need the site's standalone Check-in Module URL, plus the Access PIN if Require Access PIN is on.
Does checking in a visit check in all of its attendees?
No. Visit-level check-in and attendee check-in are separate. Each attendee keeps their own check-in status.
Why is the Access PIN being rejected?
The Access PIN may have been regenerated, which makes the old PIN stop working. An Admin can find the current Access PIN in the site's External Access settings.
Why doesn't the standalone Check-in Module URL open?
Check that the site is active, that Enable Standalone Check-in Module is on for that site, and that you're using that site's Check-in Module URL.
Why does the QR code say check-in is unavailable or expired?
QR registration stops working if the standalone Check-in Module is turned off for the site, if the visit is deleted, erased, cancelled, or declined, or if the QR link was changed.
Why can't a Briefing Manager see a site on the Check-in page?
The site must be active and included in the Briefing Manager's Site Access. A Briefing Manager's home site isn't added automatically if it isn't in their Site Access.
Why is Customer or Internal missing from Add attendee?
The Check-in page follows the visit's Request Setup. If Customer or Internal attendees are hidden there, that option doesn't appear on the Check-in page.
Need help? See How do I contact Nexus Support?.