
Contents:
Overview · Before You Start · Key Capabilities · Field Mapping Overview · Roles & Responsibilities · Prerequisites · How It Works — Step-by-Step · Data Handling & System Behavior · Business Rules · Important Considerations & Limitations · Support & Troubleshooting
Overview
Nexus can pull data directly from Salesforce into a visit request using the Add from CRM button. For this to work, each Nexus field needs to be connected — or "mapped" — to the correct field in your Salesforce org.
Because every org's Salesforce setup is different, this connection isn't automatic. It's a short, structured process involving your Experience Center Team, your Salesforce (SFDC) team, and Nexus, working together to identify what data matters, where it lives in Salesforce, and how it should appear in Nexus.
This article walks through that process end-to-end, who owns each step, and what to expect once mapping is complete.
Before You Start / What You'll Need
Before beginning the field mapping process, make sure you have:
⬇️Download the Field Mapping Worksheet and Guide
- A data needs list from your Experience Center Team — the specific data points that matter for visit decisions (e.g., deal stage, account segment, attendee role)
- SFDC admin team — The package installer team
- The Nexus field reference workbook — showing every available field per object (Account, Opportunity, Contact/Attendee), whether it's Mappable or Nexus Only, and what each one is typically used for
- A way to capture screenshots — you'll need to send Nexus a screenshot of the completed SFDC Mapping page once your team finishes configuring it
- A short window of team time — most of the effort is upfront alignment between your Experience Center Team and SFDC team; the technical steps that follow move quickly
Key Capabilities
- Pulling Account, Opportunity, and Contact/Attendee data directly from Salesforce into Nexus
- One-click population of a visit request via Add from CRM
- Support for standard and custom Salesforce fields
- Flexibility to relabel fields on both the Salesforce and Nexus sides for clarity
- Identification of fields that can't be mapped through the current managed package ("Nexus Only" fields)
Field Mapping Overview
| Area | What this means for users |
|---|---|
| Objects Covered | Account, Opportunity, and Contact (Attendee) |
| Data Source | Fields configured on your Salesforce SFDC Mapping page |
| Destination | Corresponding fields on the Nexus Request Form |
| Trigger | Clicking Add from CRM during visit request creation |
| Unmapped Fields | Nexus Only fields must still be entered manually |
| Ownership | Experience Center Team, SFDC Team, and Nexus each own a distinct part of the process |
Roles & Responsibilities
| Team | What They Do |
|---|---|
| Experience Center Team | Identifies which data points matter for making decisions on a visit |
| SFDC Team | Translates those needs into specific Salesforce fields on the Account, Opportunity, and Contact objects, and updates the SFDC Mapping page |
| Nexus | Mirrors the completed Salesforce mapping on the Nexus backend, and advises on Request Form field labels, types, and layout |
Prerequisites
- Experience Center Team has identified the data needed to support visit decisions
- SFDC team has admin access to the managed package's Mapping page
- Salesforce fields exist (standard or custom) to hold the data being mapped, or can be created
- Nexus request form fields for the relevant object(s) have been reviewed
How It Works — Step-by-Step
- Assess the data needed
The Experience Center Team identifies what information should drive visit decisions — for example, deal stage, account segment, or attendee role. - Review the Nexus field list
Nexus provides a full list of available fields for each object (Account, Opportunity, Contact/Attendee), along with what each one is typically used for.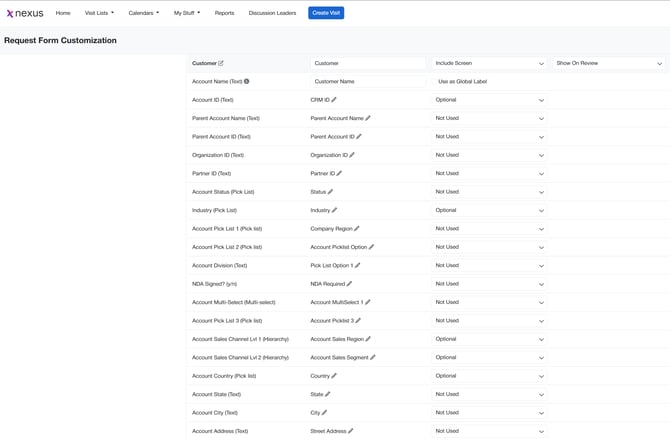
- Identify the matching Salesforce field
The SFDC team maps each identified need to a specific field in your org — standard or custom. - Update field labels as needed
Labels on the Nexus screen and/or in Salesforce are updated so both sides clearly reflect what's being mapped. Nexus can advise here. - Update the SFDC Mapping page
The SFDC team makes the connection inside Salesforce, selecting the correct field for each mapping row.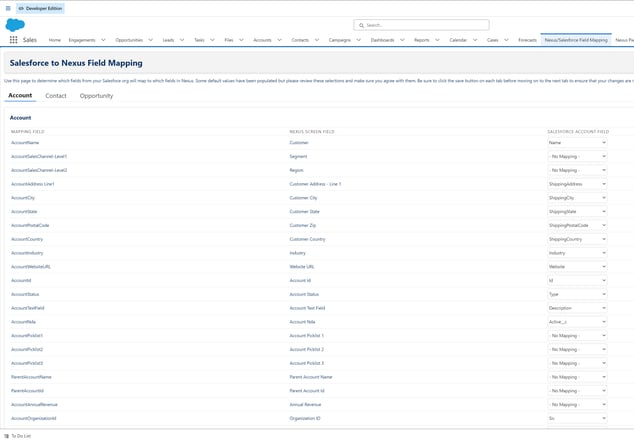
- Initial testing (Salesforce side)
The SFDC team confirms the data populates as expected before handoff — correct field, correct format, correct values. - Send screenshots to Nexus
Once confirmed, send screenshots of the completed SFDC Mapping page(s) to your Nexus contact. - Nexus mirrors the setup
Nexus configures the backend so the Request Form matches the completed Salesforce mapping. - Final validation
Click Add from CRM on a live or test record in Nexus and confirm the data pulled in matches Salesforce.
Data Handling & System Behavior
Add from CRM Behavior
When a user clicks Add from CRM, Nexus queries the mapped Salesforce fields for the selected record and populates the corresponding Request Form fields. Fields without a completed mapping are left blank and must be filled in manually.
Field Types
Mapping supports text, number, date, picklist, and yes/no fields. Multi-select and certain relationship-based fields are not currently supported through the managed package and are treated as Nexus Only.
Data Refresh
Data is pulled at the moment Add from CRM is clicked. It does not update automatically if the Salesforce record changes afterward.
Business Rules
Rule 1
A Nexus field can only pull data from Salesforce once it has been mapped on both the SFDC Mapping page and the Nexus backend.
Rule 2
Fields without a Salesforce mapping slot (Nexus Only) must be entered manually and are not affected by Add from CRM.
Rule 3
Renaming, changing the type of, or deleting a mapped Salesforce field will break the mapping until it's updated on both sides.
Rule 4
Mapping is specific to each org — the same Nexus field may map to different Salesforce fields for different clients.
Important Considerations & Limitations
- Not all Nexus fields have a corresponding Salesforce mapping slot in the current managed package.
- Multi-select fields are not currently supported for CRM mapping.
- Testing on the Salesforce side should happen before screenshots are sent, to avoid rework.
- Field mapping changes on the Salesforce side must be communicated to Nexus to avoid breaking an existing mapping.
- Add from CRM pulls data at the time of the click; it is not a live sync.
Support & Troubleshooting
If data isn't populating as expected via Add from CRM, verify the following:
- The field is confirmed as "Mappable" (not Nexus Only) on your object's field list
- The SFDC Mapping page shows a Salesforce field selected (not "- No Mapping -")
- The Salesforce field referenced still exists and hasn't been renamed or changed in type
- The Nexus backend mapping matches the current SFDC Mapping page screenshot on file
When contacting Nexus Support, provide:
- Object (Account, Opportunity, or Contact/Attendee)
- Nexus field name
- Expected Salesforce field/value
- Screenshot of the current SFDC Mapping page for that field
- Screenshot of the Nexus Request Form field showing the issue
A couple of things I want to flag before we lock this in:
- I dropped "What's New" since this isn't a release note — let me know if you'd rather frame it that way anyway for consistency with other articles.
- I left the FAQ section as a pointer to the standalone FAQ we already wrote, rather than duplicating it — but I can inline the full FAQ here instead if you'd prefer this article to be self-contained.
- The Support & Troubleshooting and Business Rules sections are drafted from my own read of the process — worth a sanity check from whoever handles support tickets today, in case there's a different first line of troubleshooting you'd want listed.